Technique · Intermediate
Polar Alignment with the ASIAIR App
Reading the ASIAIR's live alt/az error numbers correctly, and finding the bolts they're telling you to turn.
The ASIAIR's polar alignment routine does the hard part — it plate-solves two images to work out exactly where the mount's polar axis is actually pointed versus true north (or south) celestial pole. What's left is a purely mechanical job: turn two sets of bolts on the mount until the app tells you the error is close enough to zero.
Where the adjustment bolts are
Every equatorial mount head has the same two adjustments, just styled a bit differently between brands. On the Skywatcher HEQ5 Pro: a single altitude bolt (plus a locking bolt behind it) at the front of the mount head raises or lowers the polar axis angle, and a pair of opposing azimuth bolts at the base nudge the whole head left or right without changing its tilt.
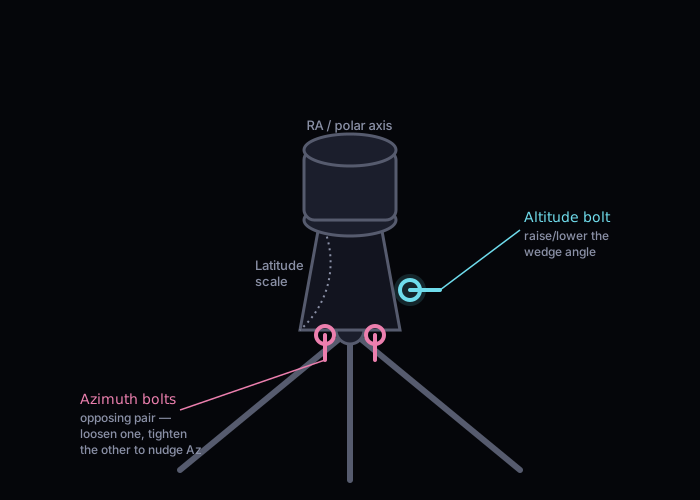
- Altitude bolt — turn to change how steep the polar axis points; there's usually a locking bolt to loosen first, then re-tighten once you're done
- Azimuth bolts — a facing pair; loosen one a touch before tightening the other, don't just crank one on its own or you'll fight the mount's own resistance
Running the routine
- Level the tripod and set the mount roughly to your latitude on the built-in scale first — the routine only fine-tunes from there, it won't fix a wildly wrong starting point
- Start Polar Align in the ASIAIR app and let it capture and plate-solve the first frame
- When prompted, slew the RA axis by the amount it asks for (the app does this for you on most setups) and let it solve the second frame
- The app now knows the actual offset and switches to a live readout that updates continuously as you adjust the mount
Reading the numbers
Once the live view kicks in, the screen shows a target-style reticle with a marker for your current position, alongside two separate error values — one for altitude, one for azimuth, both in arcminutes. These are the numbers to focus on, not the marker's position on its own: turn the altitude bolt and watch the altitude number, turn the azimuth bolts and watch the azimuth number. They're independent of each other, which is exactly why the app splits them out rather than giving one combined figure.
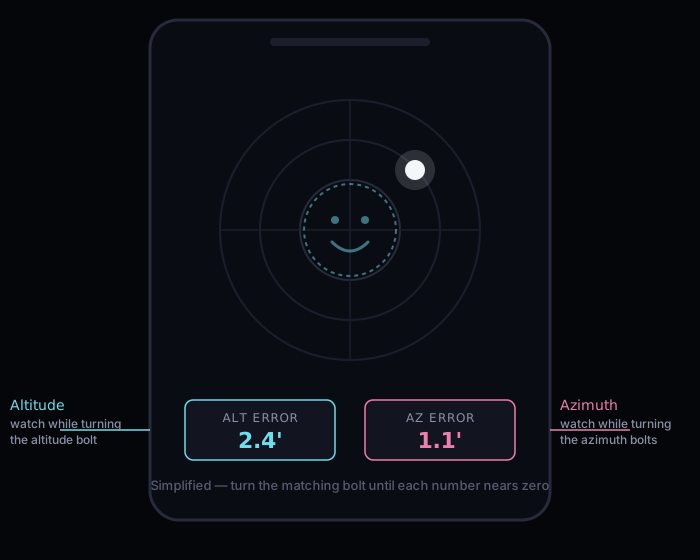
Exact screen layout varies a bit between ASIAIR app versions, so treat the diagram above as the concept rather than a pixel-perfect screenshot — swap in a real one whenever it's handy.
How close is close enough
- Under about 5' on both numbers is fine for most exposure lengths, especially with the ASIAIR guide scope handling RA drift during the session
- Under 1' is worth chasing for long unguided subs, mosaics, or anything where field rotation would show up over time
- The two values can nudge each other slightly as you work — do a couple of passes back and forth rather than expecting to nail both in one go
Tips
- Do this before attaching the camera and full imaging payload where possible — it's easier to see and reach the bolts without cables in the way
- Small, deliberate turns — a little movement on either bolt goes a long way, especially on azimuth
- Re-tighten the altitude locking bolt gently once finished; over-tightening can nudge the alignment you just dialled in
- Worth re-checking at the start of each session — even a mount left set up can drift slightly if it's been bumped or moved